


Adding Redux to an Ionic Application
Redux.
You certainly have heard this word unless you lived in a cave during the past four years, if that's the case welcome back, Donald Trump is president of the United States and World War 3 is coming soon (here is a secure source 🤣).

Joke aside.
Redux is rampaging because it allows us to write better quality applications and debug them easily.We, Ionic developers, are used to Angular bindings, modifying our properties in our Typescript Classes and having an application that evolves constantly.
With Redux a Store is available and contains the State of the application. An Action will be dispatched and go through a Reducer that will consider the current State to create a new State. This method prevents side effects by using pure functions that create new State objects, instead of mutating the previous State.
It can seem frightening, but it's as simple as this:

By the end of this tutorial, (I hope) you will be amazed by Redux's power.
Warm Up
As usual, we start by setting up our Ionic project:
ionic start ionic-redux-intro blank
npm i redux @angular-redux/store flux-standard-action redux-logger --save
Some very important plugins:
- redux and @angular-redux/store: The core plugins for using Redux
- flux-standard-action: Will help us properly define our Redux Actions
- redux-logger: Will give us more information as we access our Store
This application will be very simple. We will allow the user to create some colored squares and remove the last square in our array.
Which leads us to the home.html file:
<ion-header>
  <ion-navbar>
    <ion-title>
      Ionic Redux Intro
    </ion-title>
  </ion-navbar>
</ion-header>

<ion-content padding>

  <div *ngFor="let color of colorList$ | async">
    <div style="width: 100px;height: 100px" [style.backgroundColor]="color"></div>
  </div>

  <button ion-button (click)="addColors()">
    Add some colors
  </button>

  <button ion-button (click)="removeLastColor()">
    Remove last color
  </button>

</ion-content>
Let's start with the easy elements.
The buttons will trigger the addColors and removeLastColor methods located in the home.ts file.
The ngFor can be surprising here:
- The "$" symbol at the end of the colorList$ property: This is a classic notation for Observables. We are not working with Angular bindings here, but using an RxJS Observable. When the colorList evolves in the Redux Store, the information will be updated on the UI
- Since we are working with an Observable, the async Pipe is required otherwise the ngFor Directive won't work. The async Pipe is a god Pipe when working with Redux so keep it mind
A new div will be created for each color inside the colorList$ property. This div will show a 100x100px square and use the color value as backgroundColor.
We can now dive in the TypeScript code.
We will create the color folder, which will contain:
- color.model.ts: Structure our data
- color.action.ts: Actions to dispatch on our Store
- color.reducer.ts: Creating the next State according to the incoming Action (basically just a switch case)
Let's start with the easiest one, the color.model.ts file:
export interface ColorListState {
  colorList: string[];
}

export type ColorAddPayload = string[];

export interface ColorAddMetaData { colors: string[] }
It's preferable to be as strict as possible so our dear Visual Studio can help us (it's great to have a warning when we try to insert a tomato in an usb port).
The States inside our Redux Store will be modeled as the ColorListState Interface. They will have a colorList property that will be an array of string (ex: ['red', 'blue', 'pink']).
Only one action will have a payload: adding new colors.
The ColorAddPayload will be an array of new colors to add.
The MetaData only gives more information on how the data are structured.
We can now move to the Redux Actions!
Redux Actions
With the color.action.ts initialization:
import { Injectable } from '@angular/core';
import { dispatch } from '@angular-redux/store';
import { FluxStandardAction } from 'flux-standard-action';
import { ColorAddPayload, ColorAddMetaData } from '../../app/color/color.model';

export type ColorLoadAction = FluxStandardAction<null, null>;
export type ColorAddAction = FluxStandardAction<ColorAddPayload, ColorAddMetaData>;
export type ColorRemoveAction = FluxStandardAction<null, null>;

@Injectable()
export class ColorActions {
  static readonly LOAD_COLORS = 'LOAD_COLORS';
  static readonly ADD_COLORS = 'ADD_COLORS';
  static readonly REMOVE_LAST_COLOR = 'REMOVE_LAST_COLOR';
}
The dispatch import here is a Decorator, just like @Component, @dispatch later on will transform our methods into dispatchable Redux Actions.
FluxStandardAction helps us create standardized Redux Actions.
The last imports are ColorAddPayload and ColorAddMetaData from the previous color.model file.
We can now declare some new Action types by taking the FluxStandardAction as example.
The ColorAddAction type is the only one that will have specific types for the payload and the metadata.
Finally we start our ColorActions Service. Nothing fancy, just some constants to uniformize our Redux Actions calls in the application.
Here are our actions:
  @dispatch()
  loadColors = (): ColorLoadAction => ({
    type: ColorActions.LOAD_COLORS,
    meta: null,
    payload: null
  });

  @dispatch()
  addColors = (colors: string[]): ColorAddAction => ({
    type: ColorActions.ADD_COLORS,
    meta: { colors },
    payload: colors
  });

  @dispatch()
  removeLastColor = (): ColorRemoveAction => ({
    type: ColorActions.REMOVE_LAST_COLOR,
    meta: null,
    payload: null
  });
They are all defined by:
- A type
- Some metadata
- The payload
Very simple here, all of them return a ColorAction, they are like a restaurant’s menu. Once again, addColors is the only action that will pass some payload information: the colors that the method will receive when we call the Action.
And that’s it for the Redux Actions!
Moving on to the Reducer.
Reducer
Here is the initialization of the color.reducer.ts file:
import { ColorActions, ColorAddAction } from './color.action';
import { ColorListState } from './color.model';
import { Action } from 'redux';

export const INITIAL_STATE: ColorListState = {
  colorList: []
};

export function colorReducer(state: ColorListState = INITIAL_STATE,
    action: Action): ColorListState {

    ...
}
The imports are only there to add some typings to our data.
An INITIAL_STATE value is used as default ColorListState.
The colorReducer is just an exported function. It will work with the current ColorListState and a Redux Action, in the end it returns a new ColorListState.
As I stated before, a Reducer is just a simple switch case:
export function colorReducer(state: ColorListState = INITIAL_STATE,
    action: Action): ColorListState {

  switch (action.type) {
    case ColorActions.LOAD_COLORS:
      return {
        colorList: ['red', 'green']
      };

    case ColorActions.ADD_COLORS:
      const colorAddAction = action as ColorAddAction;

      return {
        colorList: [...state.colorList, ...colorAddAction.payload]
      };

    case ColorActions.REMOVE_LAST_COLOR:
      return {
        colorList: state.colorList.slice(0, state.colorList.length -1)
      };
  }

  return state;
}
It will look at the action’s type and act accordingly.
The most important part here is that a Reducer is a pure function. It will work with the data that are passed (state, action) and return a result without modifying anything else.
There won’t be any external interactions:
- No external data acquisitions: The reducer won’t make a call to a database or use the local storage, etc.
- No external data modifications: The reducer won’t modify a database or make some requests to a server, etc.
We have to be careful here by avoid modifying the state that we receive. It’s better here to use functions that don’t modify the objects (immutability concept).
Here is an awesome post showing how to do this for arrays.
Ok back to the cases.
Loading:
    case ColorActions.LOAD_COLORS:
      return {
        colorList: ['red', 'green']
      };
Here we just return a new object with some colors in the colorList property, nothing fancy.
Adding:
    case ColorActions.ADD_COLORS:
      const colorAddAction = action as ColorAddAction;

      return {
        colorList: [...state.colorList, ...colorAddAction.payload]
      };
We change our action’s type to ColorAddAction in order to properly acquire its payload.
The colorList property is built by creating a new array. The spread operator helps us merge the current state’s colorList and the payload array of colors received from the action.
Removing the last color:
    case ColorActions.REMOVE_LAST_COLOR:
      return {
        colorList: state.colorList.slice(0, state.colorList.length -1)
      };
The slice method is directly used on the current state’s colorList property. Don’t be afraid, this method won’t modify the object!
We take every colors except the last one.
And we are done!
The Final Touch
All we need now is setting up our app.module.ts and the home.ts files:
...
import { NgReduxModule, DevToolsExtension } from '@angular-redux/store';

import { ColorActions } from './color/color.action';

@NgModule({
  ...
  imports: [
    BrowserModule,
    IonicModule.forRoot(MyApp),
    NgReduxModule
  ],
  providers: [
    StatusBar,
    SplashScreen,
    {provide: ErrorHandler, useClass: IonicErrorHandler},
    ColorActions,
    DevToolsExtension
  ]
})
export class AppModule {}
The NgReduxModule is Angular’s Redux core module, without this, our Ionic application won’t understand anything related to Redux.
The ColorActions Class is added as a Provider to use it later in the HomePage‘s method for triggering the Redux Actions.
Finally the DevToolsExtension is another Service that you will love (trust me 😉).
Our last step: the HomePage.
Import wise it’s quite packed:
import { Component } from "@angular/core";
import { NgRedux, select, DevToolsExtension } from "@angular-redux/store";

import { ColorListState } from "../../app/color/color.model";
import { INITIAL_STATE, colorReducer } from "../../app/color/color.reducer";
import { ColorActions } from "../../app/color/color.action";

import { Observable } from "rxjs/Observable";

declare var require;

var reduxLogger = require("redux-logger");
Almost everything we created are imported there (ColorListState, ColorActions, etc.).
The novelty here is the select Decorator, it allows us to select a property from the current state in our store.
Observable is only imported here for typing purpose.
Finally the reduxLogger is required here instead of imported.
Now the good stuff:
export class HomePage {
  @select() readonly colorList$: Observable<ColorListState>;

  constructor(public store: NgRedux<ColorListState>,
              public colorActions: ColorActions, public devTools: DevToolsExtension) {

    store.configureStore(
      colorReducer,
      INITIAL_STATE,
      [ reduxLogger.createLogger()],
      devTools.isEnabled() ? [ devTools.enhancer() ] : []);

    colorActions.loadColors();
  }
  ...
}
Thanks to the @select Decorator the colorList property is acquired as a readonly information.
This Decorator is very powerful and we will see more of it in the next tutorial 😉.
The Redux store, colorActions Service and devTools Service are finally injected (about time right?).
Our precious store can now be configured.
The first parameter is the colorReducer, followed by the INITIAL_STATE, our logger initialization and finally the devTools enhancer if it’s enabled.
Once the Redux store is configured, we can load our colors by triggering the loadColors method from the colorActions property.
Launching our Ionic application:
ionic serve
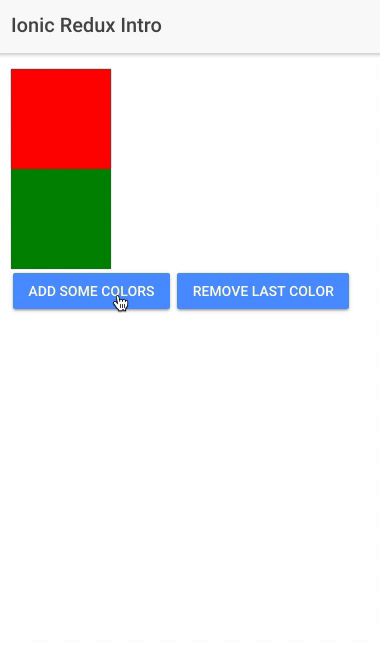
We got our beautiful squares:

That’s a good start!
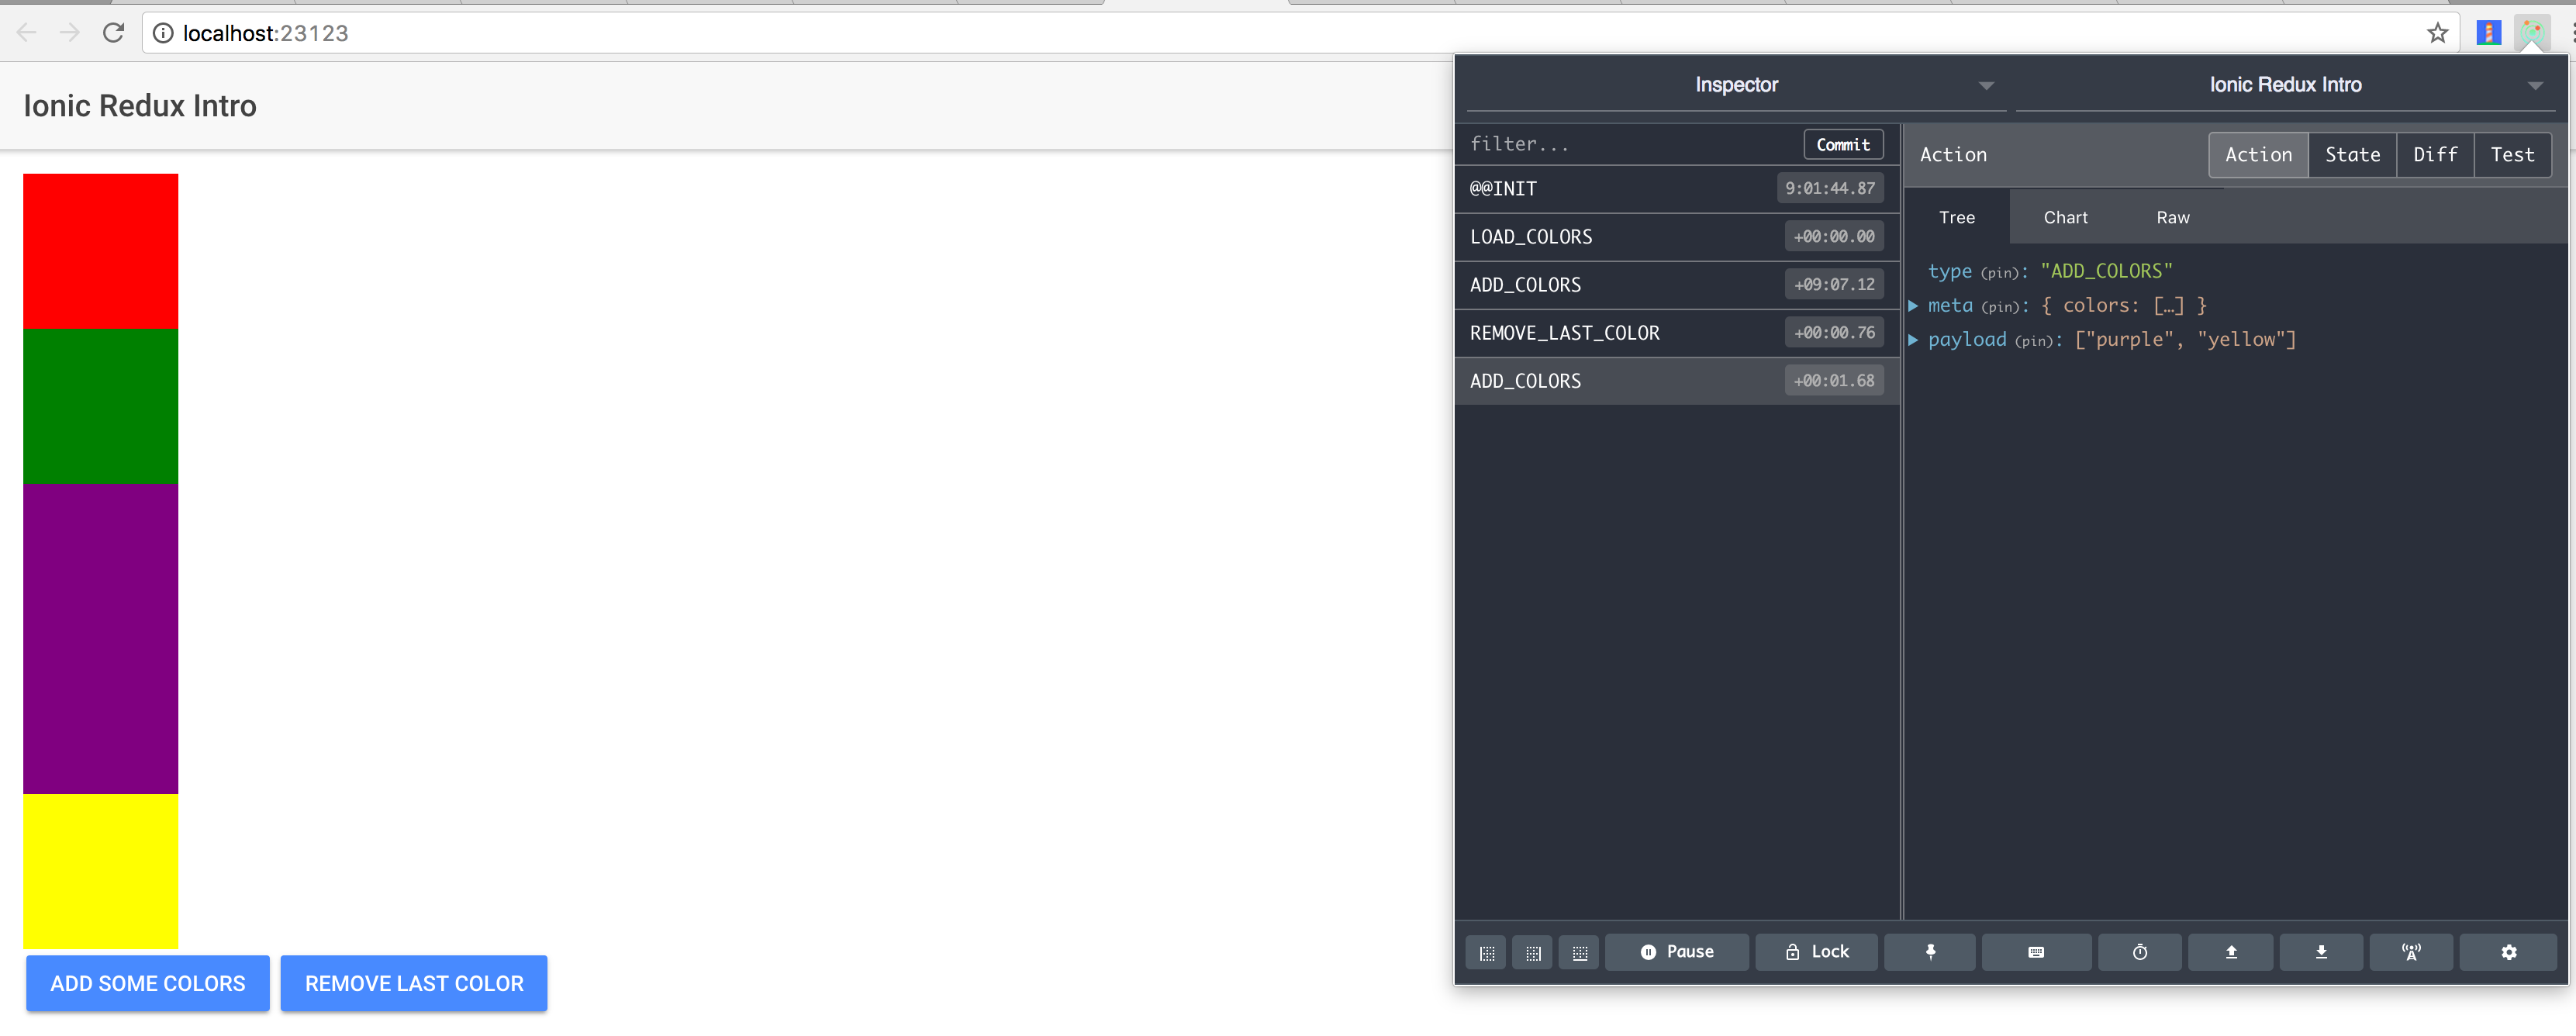
Thanks to the redux-logger library we have some nice logs:

The colorList is now populated after the LOAD_COLORS action.
Back to the home.ts file to add our final methods:
  addColors() {
    this.colorActions.addColors(['purple', 'yellow']);
  }

  removeLastColor() {
    this.colorActions.removeLastColor();
  }
We only use the colorActions property’s methods and that’s it!
Here is the final result:
Ok we have our squares, with our Actions-Reducers-Model set, but what the **** do we benefit from here?
By using this system, we have predictability and **consistency** which opens the door to new usage.
This Should Blow Your Mind
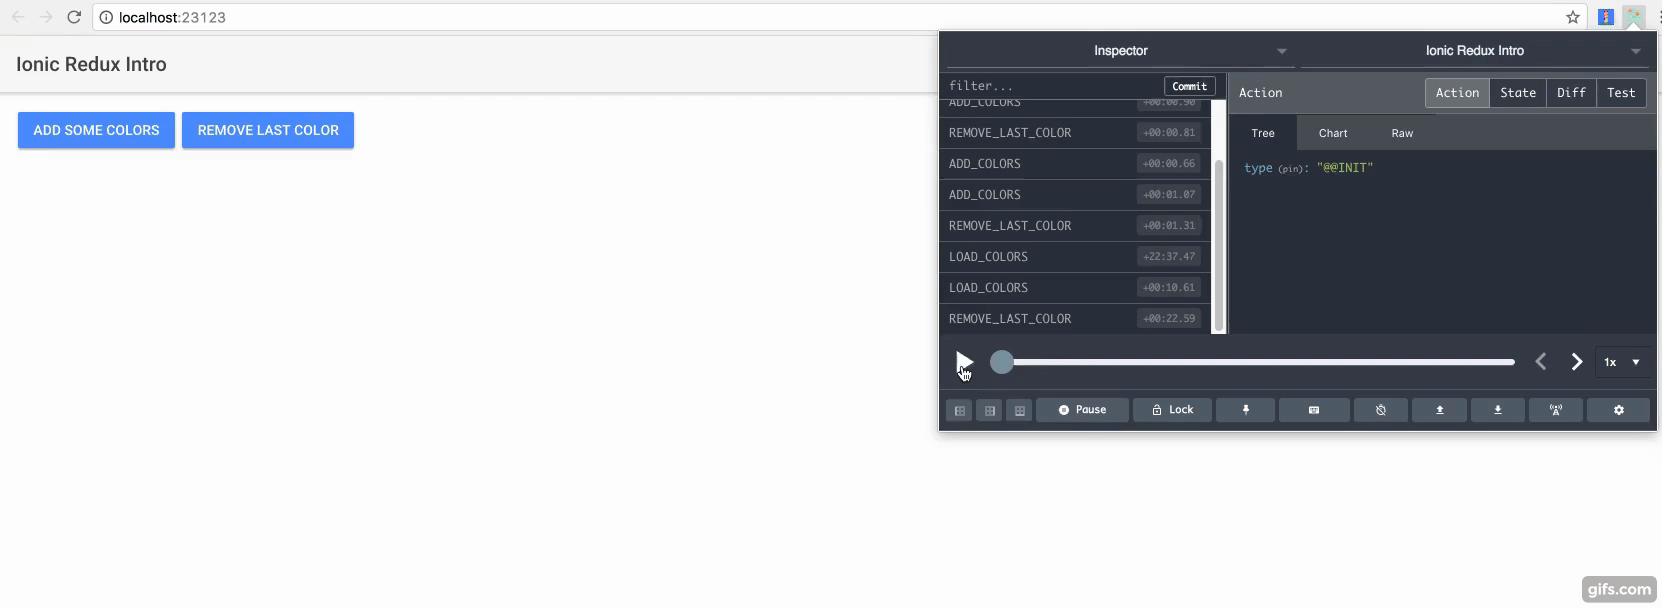
I only need one browser extension to blow your mind. It’s available there.
The Redux Devtools Extension.
Everything related to the Redux store is available there:
Ionic developers generally debug their applications by using console.log or breakpoints. Putting them at places, reloading the application, checking the value of a property, adding some logs at other places, reloading, etc. This can take some time because WebPack has to compile the TypeScript files, compress them, etc.
The Devtool is extremely powerful there. The whole history is available.
We can replay the actions:
See the evolution of the states:
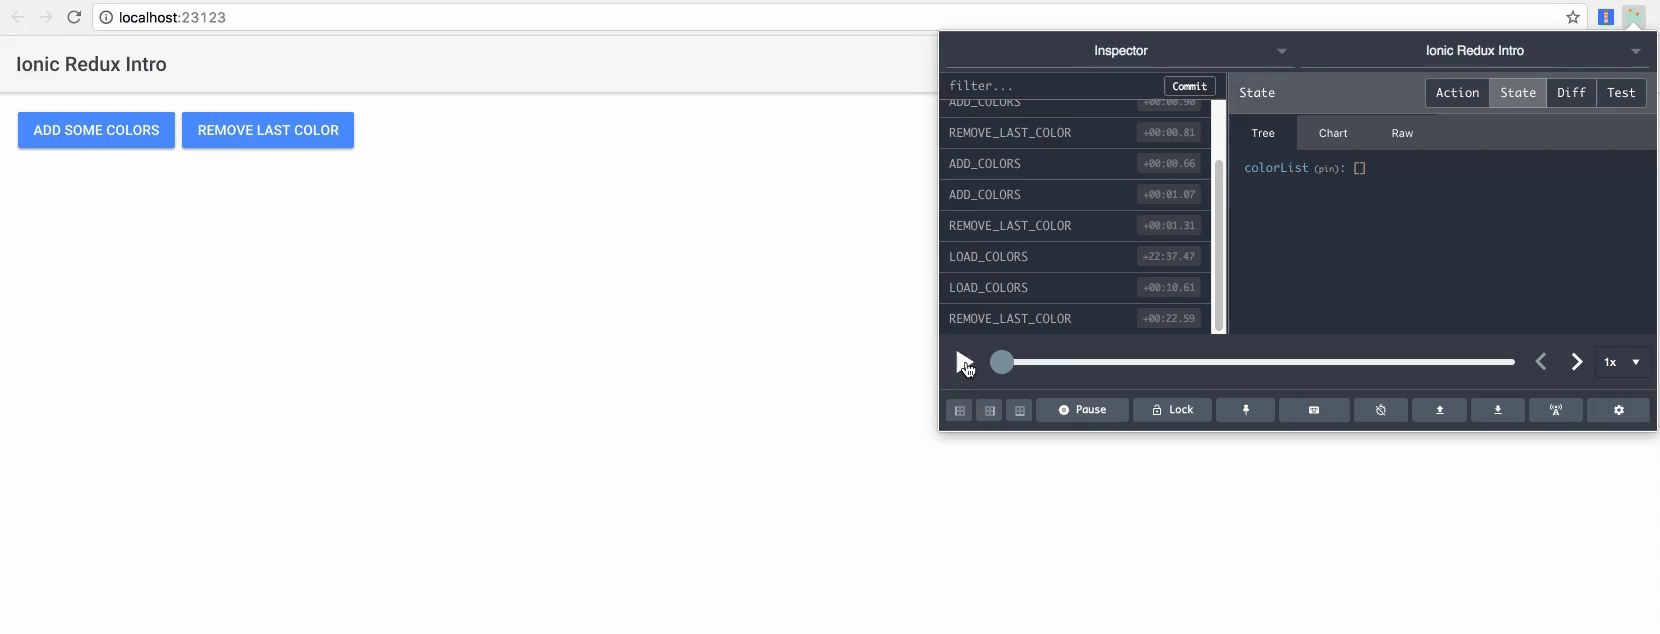
Or the differences after an action:
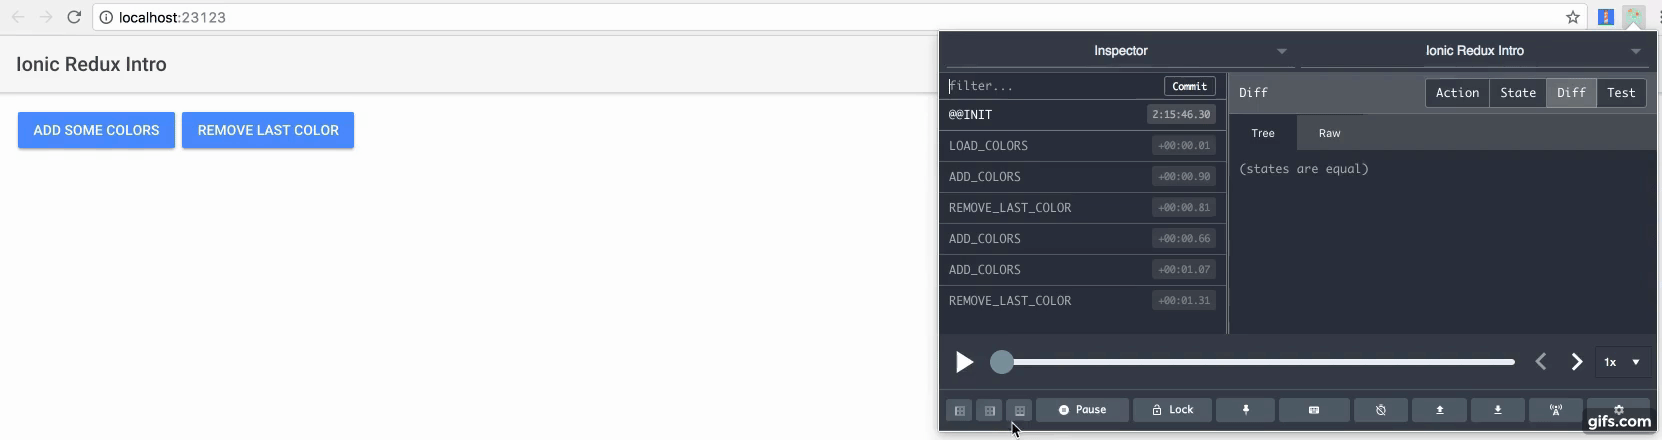
You can also:
- trigger new actions
- use the tests that the Devtool wrote for each action
- save your state to a JSON file, send it by email to your colleague so he can import it in his Java, NodeJS, or C++ application (remember this time when a bug appeared but it was impossible to reproduce and you didn’t want to press the reload button?)
Conclusion
We are generally used to creating our Ionic apps with our bindings. Redux philosophy moves the application’s State into a Store that gets updated by dispatchable Actions. Those Actions will reach some Reducers and create new States.
Since everything is predictable, it’s easier to track the evolution of the application and work around it instead of presuming how things should go.
This simplify the creation of more complex systems. The Devtool is one of them.
In the next tutorial we will see how we can easily add the time travel feature in our application so the user can undo and redo its Actions, moving from one State to another.