


Using Vue as an Angular alternative for Ionic: Parent-Children Communication
Modern JavaScript applications are generally composed of Nested Components.
It’s generally one Parent Component at the top delegating the work to its Children. They get some properties from the parent, do some work, notify the parent that something changed, which in turn updates the properties accordingly and finally updates the children.
In an Ionic Angular application, an Input-Output-EventEmitter System is used for this purpose.
A similar system is available in an Ionic Vue application and that’s what we will see in this tutorial!
We will first see how we can do this in a simple Ionic Vue TypeScript application, you will only need to install the vue-class-component library from the previous Component tutorial.
The second part focuses on using Vue Single File Components (SFC), we already did the mandatory configuration part in the same Component tutorial so head there if you want to work with .vue files.
Before diving in this tutorial, you need to know why this Parent-Children System is used.
It all comes down to three important words in modern JavaScript development: Source of Truth.
Back in the day, AngularJS broke every record with its two-way data binding.
Unlike AJAX, the view was automatically updated when a property was modified. This was mind-blowing!
However, when it came to debugging, it was really hard to understand where the data were modified. Was it in a Service? In the Parent? In a Child?
It was hard to find the Source of Truth.
Nowadays, mutating some information coming from a Parent is either useless because it won't have any effect or triggers a warning like:
That's why we need to know the famous Parent-Children System for Ionic Vue applications.
Ionic Vue TS Parent-Children
We will start with the ChildNode Component in the child-node.ts file:
import Vue from 'vue';
import Component from 'vue-class-component';

@Component({
  template: `<div>
    <div>
      Hi I'm the child, my name is {{name}}
    </div>
    <input type="text" @change="changeName" />
  </div>`,
  props: {
    name: String
  }
})
We will display the name property of the Component, this name is not just a simple property, we won’t declare it in the Component’s Class, this name value is a props, it must be acquired from the parent when the child-node Element is created.
The props field can be an array of props, however, it’s better to use it as an object to define the props types.
The last part of the Child’s template is an input, we will listen for the change event and trigger the Ionic Vue Child’s changeName method, which is as follow:
.
.
.
export default class ChildNode extends Vue {
  changeName ({ target: { value } }): void {
    this.$emit('nameChanged', value);
  }
}
It receives an event and we directly grab the target.value property by doing some ES6 destructuring.The $emit method is located on a Vue Component, it doesn’t matter if we are in pure Vue or Ionic Vue, this method will always be there. It allows us to pass a message to the upper Components, the first argument is the name of the message, the second one is the data attached to it.
We can now create a parent-node.ts file:
import Vue from 'vue';
import Component from 'vue-class-component';
import ChildNode from './child-node';

@Component({
  template: `<div>
    <child-node
      v-on:nameChanged="changeName"
      :name="nameProp">
    </child-node>
  </div>`,
  components: { ChildNode }
})
We import the ChildNode and add it to the components field in order to use it in the template.
The Element is then used.
If you have read the Ionic Vue Directive tutorial, this v-on attribute must be quite familiar. It has a nameChanged arg and a changeName value.
This arg is a string referring to which event name we are listening for. The changeName value is the function that will be triggered once the nameChanged event is received from a Child Component.
The last attribute is name, we will use a nameProp property to initialize this value.
This property is defined in the ParentNode’s Class:
.
.
.
export default class ParentNode extends Vue {
  nameProp: string = 'Child 1';

  changeName (newName): void {
    this.nameProp = newName;
  }
}
The name is initialized to "Child 1".
The changeName function is expecting a newName value.
Once this function is triggered, the nameProp property will be updated with this newName, forcing the Parent Node Component to re-render and then update the Child Node Component’s name prop.
We only need to add the ParentNode Component to the Ionic Vue root instance in the main.ts file:
import Vue from "vue";
import TsParentNode from "./app/parent-children/typescript-components/parent-node";

var app = new Vue({
  el: "#app",
  components: {
    TsParentNode
  }
});
And add the Element to the index.html file:
  <div id="app">
    <ts-parent-node></ts-parent-node>
  </div>
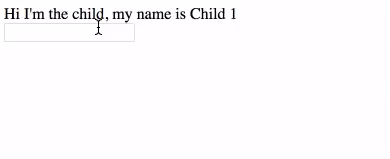
Which gives the following result:
Ionic Vue SFC Parent-Children
This result can also be obtained by using Vue’s Single File Component System (don’t forget to head there to use the Ionic Vue SFC Webpack configuration for this part).
Just like before, we start with the ChildNode Component in the child-node.vue file:
<template>
  <div>

    <div>
      Hi I'm the child, my name is {{name}}
    </div>

    <input type="text" @change="changeName">

  </div>
</template>

<script>

export default {
  props: {
    name: String
  },
  methods: {
    changeName: function ({ target: { value } }) {
      this.$emit('nameChanged', value);
    }
  }
}

</script>

<style scoped>
</style>
Just like before, we have the name prop that is expecting a String and the changeName method that will dispatch the event to the Parent located in the parent-node.vue file:
<template>
  <div>
    <child-node v-on:nameChanged="changeName" :name="name"></child-node>
  </div>
</template>


<script>

import Vue from "vue";
import ChildNode from "./child-node.vue";

export default Vue.extend({
  data() {
    return {
      name: "Child 2"
    };
  },
  methods: {
    changeName: function(newName) {
      this.name = newName;
    }
  },
  components: { ChildNode }
});

</script>

<style scoped>
</style>
The ChildNode is added to the components field, the name property is set to “Child 2” and the changeName method is ready to update the name property.
We can add the VueParentNode to the main.ts file:
import Vue from "vue";
import VueParentNode from "./app/parent-children/vue-components/parent-node.vue";

var app = new Vue({
  el: "#app",
  components: {
    VueParentNode
  }
});
And use the Directive in the index.html:
  <div id="app">
    <vue-parent-node></vue-parent-node>
  </div>
To get the same result:

Conclusion
This system is quite complex, the Parent creates a Child and pass a name property, this child renders its template by using this prop, the user changes the name in the child which emits an event to the parent that will update its local name value and update the child.
Always having to send a message to the parent in order to update the child is not awesome, but that’s our only core solution.
VueX is a great option to modify the state of the application while keeping a reliable Source of Truth, but that’s for another tutorial.